
Ptoinkk!
Make the kit
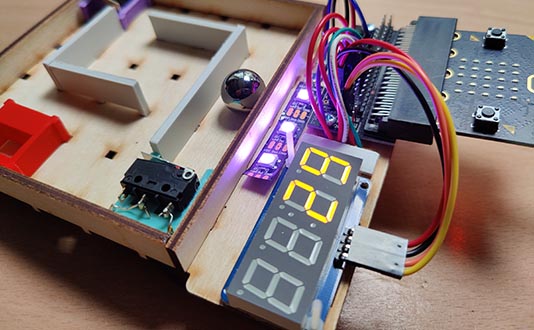
Table of Contents
Make the kit
If you want to make your own version of the kit, read on.
The electronic components can all be purchased easily, but the wooden and plastic parts need to be made. I've used a laser cutter to cut out the wooden parts, and 3D printing for the plastic parts. So you will need access to a 3D printer and laster cutter.
The board
I cut these with 4mm birch ply. Cut the red lines first, then the black lines.
Main boardOuter walls
Switch
3D print this:
Switch blockWalls
3D print these:
Wall 1Wall 2
Wall 3
Magnet block
3D print this:
Magnet blockWire holder
3D print this:
Wire holderElectronics
I recommend PiHut or Pimoroni or Kitronik for purchasing electronics for digital making. Here are some links for the electronics parts:
2x MicrobitsUSB cable
microbit connector
Use a microswitch with a very low operating force, such as this one with a 0.078N operating force:
SwitchThere are various buying options for Neopixels. You can buy long ones like this one and cut them to size:
NeopixelFor the LED display, there are various colours. Make sure you buy one with the Adafruit I2C backpack, which makes controlling it much easier:
LED displayYou'll also need some stranded wire. You don't need a lot, so you can buy a few individual spooks, but here is a link to a rainbow set!
Wire spool setOther parts
I'm using a 10mm x 3mm rare earth magnet. I bought a batch from here, but you can probably find smaller quantities elsewhere:
MagnetI've used a 16mm steel ball bearing from
Ball and roller storeWiring
There's a bit of wiring to do:
LED display
| LED | Microbit Connector | Recommended wire colour |
|---|---|---|
| VCC | 3V | Red |
| GND | 0V | Black |
| SDA | 20 | Orange |
| SCL | 19 | Yellow |
Neopixel
| Neopixel | Microbit Connector | Recommended wire colour |
|---|---|---|
| +5V | 3V | Red |
| GND | 0V | Black |
| Din | 12 | Blue |
Switches
The microswitches have 3 terminals. Connect the terminal at the pivot end to the appropriate coloured wire and the middle terminal to a red wire.
Then on the microbit connector connect receiving wires as follows:
| Switch | Microbit Connector | Recommended wire colour |
|---|---|---|
| Green | 13 | Green |
| Purple | 14 | Purple |
| White | 15 | White |
| All | 3V | Red |
Need help?
Feel free to email me
Table of Contents
©2025 - Think Create Learn Ltd